In Spring of 2019, my wife and I finished making preparations to build our dream home. Dream home is almost a cliché at this point, a real estate agent's catch phrase to get someone to buy into a neighborhood with white picket fences and an HOA. In our case, we'd spent three years designing the house from the ground up, paying off what we owed on the land itself and hammering out all the fine little details. Initially, we expected the project to take us about twelve months, as we were going to do the majority of the work ourselves. With us throughout the entire experience was my father, whose expertise in building construction made the entire thing possible. Along the way we received help from friends, my brothers, and various good people who did honest, quality work.
I've decided to do a sort of post-mortem for the whole house build. It was absolutely a unique experience, full of satisfaction and frustration. Now, as I sit in the study we built with our own hands I remain grateful for the opportunity. My hope is that someone somewhere might get something out of my experience and, if not, at least laugh at some of our mistakes.
A Quick Note: Terminology and Tools may not be familiar to people who do this for a living. Somehow I doubt a framer from Nebraska would know what a Wayne Carter means, and only people familiar with our local lingo are familiar with "That Thing." I'll try to keep it to a minimum.
Behold our raw, unfettered lands.
By the time we were ready to begin construction, my wife and I had already cleared a space for the house itself and brought in a few loads of fill dirt. The idea was to raise the foundation about thirty inches relative to the height of the road, so at no point would there be any danger of flooding inside the house. Pictured here, more dirt was brought in prior to beginning to dig.
This is May 2019. This is Florida. If sunlight has a weight, it's about thirty pounds on top of your shoulders when you've got a shovel in your hands.
You'll see this view again as time goes on. We'll call this the A/B Corner of the house.
The first real task is to put up the batter boards and pull strings. Not only is this how you establish the perimeter of the structure, it's also critical to making sure your footers are square, level, and exactly where you want them. Because we were doing it all ourselves, this was simply a matter of picking a spot and using a transit to shoot the relative elevation. From there, a little work with stakes and hammers create the batter boards.
Batter boards are just the beginning, but they're pretty damn important for everything that follows.
Pulling strings ensures your footers will be square to each other and gives a good point of reference once the digging of the footers begins. We cut a clear path for the strings, squared them up, and got ready for the dig.
Pro Tip: Use brightly colored string instead of white or black. Saves your eyes the hassle.
The engineered plans for the house specified footers that were 18" wide and 10" deep, which is pretty standard for our part of the world. Not content to do the bare minimum, we made our footers 24" wide and 12" deep. Go big and go home, that's our motto. Of course, it was easy to talk a big game about digging several hundred linear feet of trenches before your shovel ever touches dirt.
Not pictured: Gallons of sweat.
A moment to discuss the state of the property.
We purchased the land several years prior to building, but we'd done a lot of work to clean it up and get it ready. My guess is the previous occupant had run some kind of automotive shop out of his shed, doing a lot of bodywork and engine repair. I base this assumption on the sheer number of auto parts we dug up as a part of the house build. Several times in the middle of a footer we'd have to stop to cut through a random buried pipe
or chip our way through a pile of ancient, forgotten concrete wash-out.
Fun for the whole family.
It took about a week and a half to get the footers finished and ready for steel. Remember, on a good day we had three people working: my wife, my father and myself. Most weekdays, my wife had to be at the office, leaving two of us to toil in the sunlight.
The plans called for 2 rows of 1/2" rebar, but because of an odd quirk in the cost of materials we ended up getting 5/8" rebar. Since we'd made the footers wider and deeper we also decided to add a third row for additional strength. The whole idea of adding steel to the footers is to bolster the concrete's compressive strength with tensile strength. My brother the engineer could probably explain it better, but remember who you're talking to here: some dumb fireman who thought it would be a good idea to pour concrete in June.
This turned out to be a decision I regretted.
For one thing, that much extra steel ended up being quite a bit of extra work to bend and secure in the footers. Still, that wouldn't have been so bad if it weren't for the work of bending the damn rebar. Stepping up from 1/2" to 5/8" made bending the rebar by hand a nightmare. We ended up jury-rigging a system to bed it just to save ourselves time and frustrations. For science, the system can be recreated as follows:
First, insert your rebar into the place where a trailer hitch is supposed to live.
Then, using the complicated device known as "this pipe we found in the woods," bend the rebar to your desired length.
Eventually, we ended up with the prettiest little reinforced footers mankind has ever seen.
Ain't that just the most beautiful sight you've ever clapped eyes on?
After a visit from Mr. Inspector, which I'll talk about in depth at a later time, we were ready for our first day of concrete pouring. Overall, we poured concrete on 4 separate occasions: Footer Day, Slab Day, Porch and Driveway Day, and a small, half-yard pour for the air conditioner units. If I go the rest of my life without pouring another yard of concrete, I'll die a happier man.
This pour, the Footer Day pour, was almost thirty yards of concrete delivered by three trucks over the course of a blistering afternoon. We had planned to start earlier and beat the heat but instead of arriving at nine in the morning, the first concrete truck rumbled up the driveway at half-past noon. The only saving grace for the whole thing was, thanks to the placement of the house, we were able to use the truck's chute to pour concrete down almost every footer without the help of the dreaded wheelbarrow. If you've never wheelbarrowed concrete around, you've missed a critical aspect of human suffering.
Pictured here: Human Suffering.
These little rods of rebar are what we called turn-ups. Not turnips. They're wired into the rebar deep down in the concrete and serve as a way to tie the block stem wall to the footer. Once the final slab is poured and the blocks have been filled with concrete, these turn-ups will essentially make everything into one solid piece.
Who wants to get turned-up?

The distinct texture on the finished footer is made by a precision instrument called a metal rake. Adding texture now will help the block wall adhere to the footer and add strength to the overall construction of the house.
The last view from the A/B corner at the end of a very long day.
The next step is to get ready for the stem wall.
Ignore the roll of mesh in the foreground. We call it vampire wire and that comes later.
In our case, we planned to do a wall two courses tall all the way around the structure except for where the garage door was planned. Here's where our first contractor comes into the picture, an individual who will go nameless. We'll call him Randy Jones. Randy and his crew are bricklayers, which is a skill I don't pretend to possess. Our agreement with Randy is that, for a set price, he'll do the stem wall now and come back to do the brick veneer once we've progressed far enough. In my naiveté, I gave him a third of the overall price to begin work, with the explicit agreement to divide the rest up before and after the veneer job.
It was a disaster
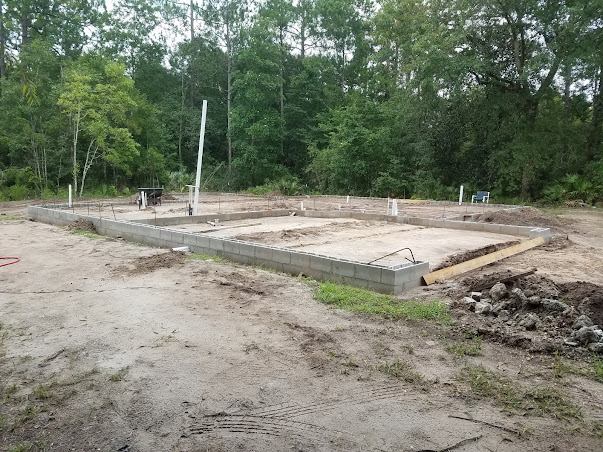
Credit where credit's due, the stem wall did turn out pretty good.
We got the stem wall finished, but as soon as it was done Randy Jones comes back and says he's going to need more money for the rest of the job. Not just a little more but nearly double what the agreed-upon initial price had been. Bear in mind this isn't an issue of materials cost: we were paying for labor only. Every big of block, mortar and sand remained our responsibility.
Eventually we parted ways with ol' Randy and ate the cost of what we'd already given him for the stem wall. It may not be the most expensive two-course block wall in history, but it's probably pretty close. I consider it a pretty cheap lesson, all things considered. Moving forward with other contractors, I learned to get quotes in writing and only do business with highly recommended professionals.
One final view from that A/B corner. It may not be house-shaped yet, but it's no longer just a wet hole in the ground.


Comments
Post a Comment