By Our Own Hands or None - Just Plumb Dumb
We Are Not Plumbers
A Comedy in PVC Parts
In June, 2019, the stem wall was finished and it was time to begin slab prep. Before we could pour concrete, we needed to level out and compact the dirt, dig the interior footers, and get the drainage plumbing finished. Sounds pretty simple, right? After all, dirt and footers are simple enough to get right, just a matter of hard work. Well, what makes that hard work even easier?
Heavy equipment.
Heavy equipment.

Through the miracle of "modern" technology, you don't need to throw out your back.
Once levelled, the dirt inside the stem wall needed to have a few minor adjustments made to the height, which was accomplished by wheelbarrow and shovel. I cannot stress enough how heavy comrade sunshine is on days like this, but details matter when it comes to the foundation.
After the dirt's all pretty much in the right place, it's time for Mr. Compactor to come in and do its job. If you're unfamiliar with this little guy, it's essentially a ninety-pound weight strapped to a dirt bike motor and a steel plate. Running it around on the dirt stabilizes it in place, making for a firmer bed when it comes time to actually pour concrete. Remember, you don't want big voids opening underneath your nice, pretty slab.

Mr. Compactor is like a day at the spa, as long as that spa is in the middle of an earthquake.
With the dirt compacted and in the right place, it's time to get to plumbing. A quick word before going any further: we are not plumbers. In fact, many of the kind people who came to help throughout the project were delighted to remind the us that Gainey is the antithesis of plumber in many places around the world. Still, plumbing's not too complicated, right? Especially drainage. One inch drop per ten foot, or something like that. How hard could it be?

Pass me a joint. It's about to get frustrating.
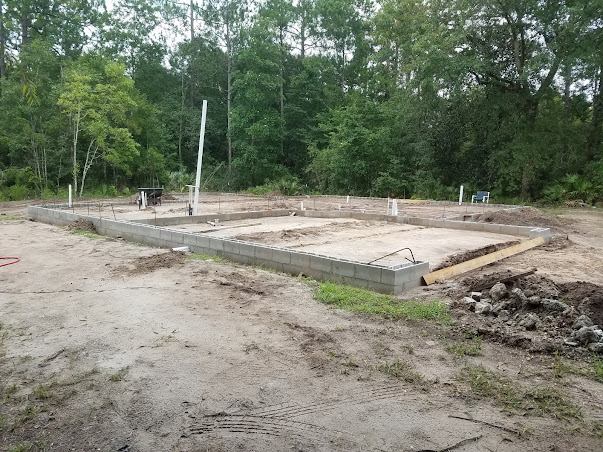
The plan here is to lay out all the plumbing to get a good idea of where to dig and what kind of fall we'd need to get proper drainage. Except for one place in the kitchen, no pressurized water would be in the slab, so everything just needed to have good connections and slope in the right direction. Ultimately, it would all come out of a single 4" pipe at the C/D corner of the house, visible on the left-hand side of the following picture.

Note the interior footers for loadbearing walls. More on that later.
There are two bathrooms downstairs, two upstairs, a kitchen, and a laundry area in the garage. All of these need to be tied together in a way that disallows wastewater to flood up in an unwanted area. Most guests don't appreciate taking a shower and soaking their feet in septic backwash.

Coming from the left is the drainage from the kitchen, laundry, and master bathroom upstairs.
The main exit drain is on the far right, leaned up against the stem wall.
To make sure nothing ever flooded into the house itself, we established a failsafe in the garage. This drain, shown all on its lonesome below, is a full six inches lower than any other drain in the house. In theory, any unwanted stoppage will be flood out inside the garage, minimizing damage. I suppose only time will tell if it actually works.

Digging those interior footers meant a lot of dirt needed to go.
With everything laid out and a good idea of where to go, it's time to get to digging. Every pipe had to have its own trenchline dig by hand and each trench had to be sloped using a level and some quick napkin math to make sure it wasn't too far out of whack. The way I understand it, if the pipe is too steep all the liquids will outrun the solids, leaving the turds to form little blockages. Too shallow and nothing moves, causing more blockages.

Here is the garage, with the main utility chase for A/C purposes.

The other end of the utility chase, turned up in the A/C closet.
You know what they say about the best laid plans of mice and men?
Yeah. It turns out making a bunch of three-way connections while trying to maintain the correct slope and trying to get toilet flanges to be at the right height, angle and orientation is a struggle.
At least Lennie got put out of his misery.
Here we come to the classic aphorism of the building project:
I can live with it.

Pictured here: My recurring nightmare.
Lucky us, we also decided to put those interior footers directly in the place where our plumbing had to go. The best part of digging the interior footers was getting them looking perfect, with those beautiful beveled edges, and then coming back to find out Mother Nature didn't want you to have nice things.

It's always such a joy to have heavy rains while you're trying to dig proper footers.
The guest bathroom downstairs was intended to have a walk-in shower suitable for a walker or a wheelchair. Not that I expect to live long enough to need them, but it's always a good idea to plan for the future. Also pictured below is the drain system coming from the upstairs guest bathroom, hidden inside the exterior wall. Making these connections plumb and with the correct slope was just...just so much fun.

In the kitchen, seen below, we had to run hot and cold water pipes to the island sink area. These are the only pressurized pipes in the slab, thankfully, and running them was relatively simple. Behind those pipes you can see another turn-up in the wall, which goes all the way to the roof as a vent stack.

Next comes the pressure testing. Nothing too fancy. The water pipes just need to hold pressure for 24 hours and the drainage pipes need to hold ten feet worth of head pressure without blowing apart.

Simply fill the pipes with a water hose and let it sit until Mr. Inspector shows up to fail us because he didn't like the way some of our joints looked.

Once that inspection was finally passed, we were out of the plumbing business for the time being. All told, it took about a week and a half to lay all the pipe, glue the joints, bury them and cap the ends. Before concrete, there's still going to be a few things, but we're on our way to something other than dirt beneath our feet.
A note on glue and primer: I kicked over approximately 10 cans of purple primer throughout the house built. It became a kind of joke. It got to the point where I would buy two every time just knowing I was going to punt one off the side of the house without meaning to.

Pour one out for the homies.

My dad and older brother, Calvin. Just plumb crazy.

Comments
Post a Comment